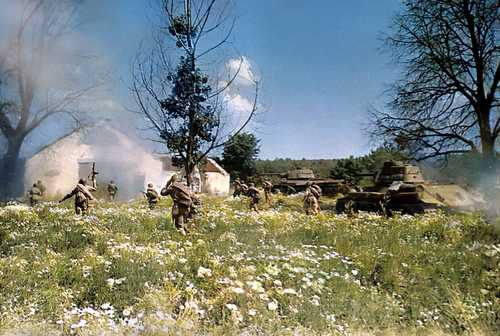
Soviet Tanks against a Blocking Force
Reminder: Click on images to view them full sized.
A rather obvious advantage of the CMx2 engine is that it is very close to a true 'what you see is what you get' representation of combat, giving it a fidelity that outstrips its otherwise no-frills graphics. It also means that, quite apart from more traditional hex-based games or 'virtual tabletop' experiences, things like terrain analysis, spotting and communication are a lot more fluid. The game, in short, requires less of a suspension of disbelief than some of these more tried-and-tested wargaming formats.
This makes it a uniquely useful tool for training and teaching, as has been demonstrated
time and again. ARMOR magazine, writing in the early 2000s, had once touted Shock Force as an excellent tool for junior leaders seeking to test theories without exhausting chagrined ORs on FTX. The ultimate display of "Combat Mission as a teaching tool" can be seen in the relatively recent release of
Combat Mission: Professional Edition for the UK Ministry of Defence.
An individual who has frequently used the game as a visual teaching and demonstration tool is Bil Hardenberger. For those of you who have been involved in the community to any degree, he's a gentleman that likely needs no introduction. For those who remain unaware, Bil is an excellent player and general enthusiast of the game, whose passion for the series eventually got us the excellent "Cold War" title. He runs his
own blog that is considered required reading by a lot of people.
Let me get to the point: Way back in 2015, Bil made an
interesting post, based around two translated tactical anecdotes from the
Red Star magazine. In his commentary on the translation he displays a nuanced stance on how Soviet tactical doctrine was actually exercised in the field (something that can be shockingly lacking in our community), and what lessons could be learned from it.
Well, what would the anecdote and lessons in the above post actually look like? Bil never took the opportunity to offer us a display in CMx2, and I had the free time, so I loaded up the editor and got to work. In today's blog post I'm going to be dealing with the first of the two anecdotes.
Setting the Scene
The original anecdote wasn't published in English until December 30, 1943 in the US's
Tactical and Technical Trends periodical. You can find an online copy of them all
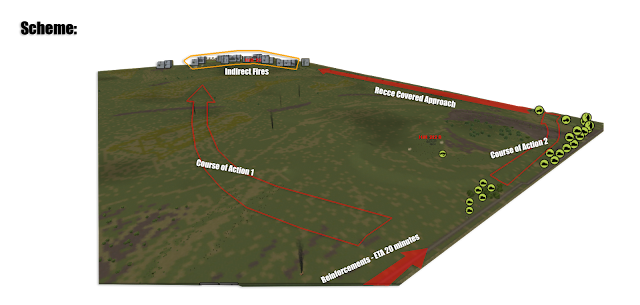
here. If the events were based at all in reality they therefore would've occurred well before Red Thunder's time-frame. So, some artistic licence was needed when I created the scenario. With the mapmaking complete, we (because you're along for the ride, dear reader) now find ourselves in the shoes of the commander of a Soviet tank regiment, acting as a forward detachment reinforced with mortars and some infantry.
Our mission is simple: exploit a penetration of the enemy's main line of resistance and get into their operational depths, before wheeling to the south to cut off their likely routes of retreat. Turn a tactical success, in other words, into an operational breakthrough. This is a high tempo operation and time is naturally of the essence, as is speed.
We've run into a problem, however. Supposedly moving in advance of us has been forward recon and security elements, but we have thus far failed to establish contact with them. We're moving blind, relying on our organic recon assets. The regiment's forward detachment had reached the point where they were supposed to wheel south, a terrain feature called Hill 212.8, when it suddenly came under fire. The lead company commander, following behind this forward force, immediately launched a standard attack across the southern field but was bloodily repulsed and compelled to retreat back behind "our" hill.

This is where the situation stands as we come up with my headquarters and the second tank company in tow. Immediately to hand we now have the remaining T-34s of the 1st Company, the entirety of the 2nd Company, the recon platoon and a battery of mortars. Following behind at some distance, perhaps 20 minutes out, is the third company of the regiment, tank riders and an additional mortar battery.
Every minute that passes will give the enemy time to piece together a coherent line of resistance, bring up reserves, and amass defensive fires. Time is of the essence, and not a minute can be wasted. What can we, the commander on the spot, do?
Option 1: An immediate and co-ordinated attack
Time is of the essence so we will default to the supposed "doctrinal" solution, the second company, representing a second echelon, will launch an immediate attack. With one mortar battery forward and the intel gleaned from the forward detachment, we can co-ordinate supporting direct and indirect fires. The survivors of the 1st Company and the RHQ combine to create a support-by-fire position of six tanks, which can produce quite a bit of concentrated direct fire even at this extended range.
The scheme: get to the base of Hill 221.3 and turn the enemy's right flank by skirting around the base of the hill, where the anti-tank defences appear to be weakest.
I want to stress, this plan isn't deliberately "stupid" - and just like in the original anecdote, it has an iron logic to it. I am co-ordinating fires as best as possible and maximising the speed of the excellent T-34 tank to break into the enemy's fighting position, where I can do damage and perhaps bring up the rest of the regiment as they arrive. Further, it is wholly in line with the letter of my orders. This reaction is building on my knowledge of the enemy and putting operational tempo above all else.
Fires are immediately ordered on the guns that can enfilade my right flank.
While, from hull-down positions at my start line, direct fires are placed on the left-side ATGs.
While the 2nd Company, with recon operating just a bit ahead, gets moving and moving fast.
At first, all goes well, and Hill 221.3 remains silent, no doubt well suppressed by the mortar barrage and the direct fires. Then, tell-tale contacts begin to appear...
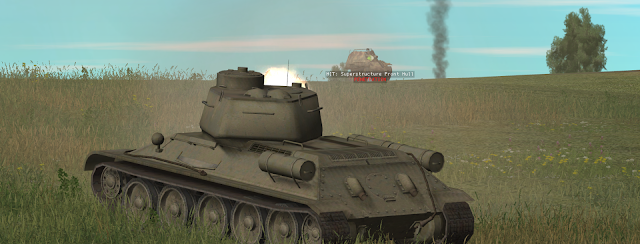
Self-propelled guns wheel into hull-down positions, having, presumably, sat in the reverse slope of the hill and safe from the attentions of my fires. They promptly engage the manoeuvring elements, who alternatively stop and fire, but the Marders got the first shot and have the range, four T-34s are promptly knocked out within a minute.

Casualties mount rapidly, and the next turn's exchange ratio is even worse, despite the T-34s manoeuvring into some decent folds of terrain. In exchange only two Marders are ultimately lost in a firefight lasting less than four minutes.

Elements of the recon platoon and a surviving T-34 do make it to the base of the hill and are in a position to manoeuvre, but what can be accomplished? There's no disguising it, this strong blocking position has offered me yet another repulse. Not only has this time been wasted, but tanks and crewman's lives - and make no mistake, remove all sentimentality from this for a moment if you want, the material casualties alone are devastating; even if I renew the attack with the third company, it's unlikely that a single company and a pair of mortar batteries will accomplish anything. In the unlikely chance of success, which is surely to result in high losses yet again, I'm going to have the equivalent of maybe an over strength company astride the enemy's route of retreat...instead of a regiment. I'd win the immediate fight and fail utterly to accomplish my actual objectives.

It's clear that, even with the additional indirect fires, a base of fire and a rapid approach under the cover of both, I lacked the combat strength to make this form of attack with only a single company, or perhaps more accurately, a company at a time. In fact, my performance fell well short of even the similar costly solution in the anecdote. Let's return to Bil's blog to see how option 1, the one exercised in reality, worked out:
Without waiting for the artillery and the mortars (only one battery arrived at the position in time) the commander ordered all the tanks to attack. The tanks moved forward, deployed in a line. As soon as they came up over the hill, the Germans opened intensive fire. To pass through the fire zone the Russian tanks moved forward at full speed and reached Hill 221.3 in a comparatively short time.
More or less how things worked out for us, let's read on...
The enemy wavered and then began to withdraw. A certain tactical advantage had been gained but at the cost of unnecessary losses. Several of the Russian tanks had been disabled thereby restricting the possibilities of exploiting the advantage.
So in reality the Soviets managed to break into the objective and compel a retreat, but at high cost. Unsurprising, given the 'shootout at the OK corral' nature of these types of offensive tactics. It very easily could've gone that way for the Soviets in reality too, and that appears to be the general thrust of the Red Star article's point. In a circumspect way the author of the original document states:
The mistakes of the commander of the main detachment were as follows:
(1) He did not provide for proper reconnaissance during the offensive, with the result that the encounter with the enemy was unexpected.
(2) When the enemy's defense system and fire power had been determined, the commander hurried unnecessarily to attack with his tanks without the support of the artillery, of which there was sufficient quantity, but had not been drawn up in time.
(3) The commander paid too much attention to the fast forward movement of the tanks and forgot about the organization of the battle.
Option 2: Slow is Smooth, and Smooth is Fast
The article's conclusions are clearly sound, but there seems to be a certain friction between the commander's mission and the criticism that we 'hurried unnecessarily to attack'. Let's recall what I said earlier when I summarised the operational context:
Every minute that passes will give the enemy time to piece together a coherent line of resistance, bring up reserves, and amass defensive fires. Time is of the essence, and not a minute can be wasted.
Note what I emphasised. Doing proper reconnaissance, a personal view of terrain and waiting for an effective concentration of fire is never a waste of time. In CM the operational context is translated quite literally to a timer, and despite what many players think, in reality you are always on the clock. The desire to get to the main task at hand can clearly be overwhelming and it is a frequent mistake of leaders of all levels to feel rushed and therefore rush. Now, the Soviet commander in reality didn't have the luxury of a do-over, but we do. Let's put the above three points into practice.
So lets start with a brief terrain analysis. The terrain the first company attacked across is typical of the Eurasian-Pontic steppe - it rolls gently and is often broken up by ravines large and small, but is otherwise and generally "flat."
Feeding in the second company, even with the support of the surviving first company and newly arrived mortar battery, would likely result in a repeat of the first attack - and burning T-34s that dot this landscape are testament to that.
The right flank of the area of operations has a small balka - a ravine, that runs generally south. It may be concealed from German fire for the majority of the route.
If that's the case, it may provide an excellent attack route, as it exits basically right onto a known enemy position and allows for a turning movement across the flank of the entire enemy position.
Based on the first iteration of the attack, we know that even with a modicum of support fire an attack at high speed across the open ground can get us close to the main enemy position, with relatively few losses. What's needed, no matter what my scheme is, is sufficient mass and fires and effective co-ordination of both. While the rest of the regiment is still 20 minutes out it's still imperative that I wait for them to arrive before launching any kind of main effort. With that said, I have two potential courses of action:
That's not to say that while I wait for the rest of the regiment I will be twiddling my thumbs. First off, a route recce is necessary to see if the balka is as covered an approach as it appears - and the regiment's organic scouts are put to work on that.
Next, while I am waiting for the arrival of the second mortar battery assigned to my force, and husbanding ammo from the available battery, I can still put it to work. The 1st company's sacrifice gleaned us excellent intel. Point fires to attrit fixed defences will begin immediately.
The Germans send their own indirect fires our way, likely trying to spoil observation - and some fancy footwork is needed from the Observers to keep themselves healthy and hale.
As my fires lift on one target, I'm swift to immediately re-task them to another known enemy position.
While all this is happening, the recce have pushed up to 'final cover' - the last bend in the balka before it opens up and exits back onto the steppe. A brief halt with dismounts forward...
...reveals the soft-skin prime movers for some anti-tank guns, which are driven off or knocked out. The recon presses forward and urgently radio us that the route appears to be clear up until this point.
The recon pushes even further forward but begins to take effective fire...survivors pull back and report these additional contacts. Okay, we now know how far forward we can deploy and where to apply our fires. We've reached the 'decision point' and can now begin to effectively co-ordinate all fires for a single, centralized effort.
2nd Company begins moving up through the balka, and as they begin moving up, the mortar battery puts down some considerable fires on the anti-tank guns closest to the exit.
A quick conference occurs between the Recce leader and the company commander, where the up-to-date intelligence is passed by word-of-mouth.
Now for another brief halt...as we wait for the heavy prep fire to land and shift to the newly identified anti-tank guns. Remember; slow is smooth, smooth is fast.
While all this is happening, the tail end of the regiment shows up.
Events now speed up considerably. The ballet is about to begin, so the 3rd company leader quickly pulls into our CP both to offload the new forward observer and get a verbal briefing directly from us. The rest of the company wastes no time motoring into the balka with their tank riders. Tanks with riders in CM are limited to moving at sane speeds, so they will take several minutes to navigate the terrain. In the meantime, however, the second mortar battery can be put to use and the lead company can begin actions on objective.
'The Ballet' - Co-ordination of massed fires and movement for a single purpose
With the tail of the regiment closing in and the fires beginning to land, our patience has paid off. The lead company explodes out of the ravine just as the indirect fires begin to slam down. In conjunction with this indirect fire and massed movement, the remnants of the first company and RHQ rumble forward into support-by-fire positions and mass direct area fire. While the indirect hits one suspected AT position, the direct hit an adjacent one. As the mortar fire lifts, the batteries are immediately re-tasked on suspected positions further down the ridge line, in line with the general 'left hook' movement being executed.
The effect is immediate and overwhelming, and 2nd Company manages to get out into the open with the loss of only one tank. The support by fire similarly only suffers one tank disabled. It appears the enemy are stunned by this violent co-ordination of fires.
We can see that the general theme isn't actually all that different from the first option. A massed attack on line by a company, with support from the surviving first echelon and indirect fires; all against known weak points in an enemy position. The differences however, are equally important. First, judicious use of terrain lessened exposure as we deployed to attack. Second, we waited until sufficient mass of both men, material and fires were available. So, even if this second company eats it and eats it hard, as it did in 'option 1' the regiment as a whole will be better positioned to make something of the effort.

We are now in a position to begin rolling up the enemy position. I order the majority of 2nd Company to try and strike towards the reverse slope and flank of the hill.
Confidence momentarily soars as the company take no further fire, identify several smashed pak positions, and shoot up a bunch of light-skinned vehicles. As we crest the hill, however, we get a rude surprise. The Marders from our first run-through have friends!
At this point the 3rd company is joining the fray, and is starting to exit the ravine. It's not all smooth sailing, and they take fire from the Marders which have motored forward. The RHQ and 1st company, jockeying for firing positions in their original positions, do their best to try and lay into the Marders. It's not enough, which isn't surprising given the engagement range is around 1800m and the T-34s are notorious for inaccuracy at range. A T-34 is disabled and several tank riders made casualties as a result.
Nevertheless, the tank riders and additional forces push through and get into the fight. The balance continues to swing inexorably in our favour. The Soviet infantry immediately begin an exchange of fire and a general attack on surviving anti-tank gunners and security troops.
As 2nd company gathers on the reverse slope, every effort is made to continue to concentrate fires at every level and insure that we are engaging with entire companies where the enemy has a handful of forces.
Nevertheless, even with this extreme massing of fires, it's becoming a bit of a dogfight. Ultimately, casualties are always going to be taken in this type of tactical doctrine. If we're going to take casaulties, then we need to insure they are being taken for a real purpose; while its ugly, and T-34s are burning and men are dying, they're dishing out absolute punishment in return.
Likewise, the tank riders fight their way up the crest against disorganised enemy infantry. Clearing out these foxholes give more breathing space for the T-34s to deploy, free from the worry of close-ambush. Primarily, this allows the 3rd company to get into the fight, as significant real estate on the crest is now safely accessible to them.
The battle rages over the next few minutes. I have the advantage of being able to jockey back and forth into the reverse slope. The enemy armour - though now largely re-oriented to face the threat - meanwhile remains exposed. Notice the complete violence of the fires; the main engagement, the indirect fires landing in the general area, and supporting direct fire coming from the RHQ position. Just like the first run-through of the scenario, the battle has become an inferno of fire - but this time it is the defenders who are burning.
Elements of the 3rd company begin to skirt to the left, around the base of the hill, and strike the surviving enemy from the flank. This move is covered by the RHQ and 1st company. The Tigers die extremely hard, but we have total freedom of manoeuvre at this point in the battle and can start putting rounds in their side and rear.
This total overmatch leads, inevitably, to a breakthrough. Advancing steadily in line, the survivors from the two assault companies push to the south, as planned, and continue the exploitation.
My material casualties in tanks are about equal to option 1, and I got a bit cavalier with my scouts later in the game and exposed them prematurely. So over all, the amount of KO'd armoured vehicles is actually higher, as are the number of men physically made hors d'combat. The latter, at least, I think can be chalked up to the fight becoming a close-quarters affair in which infantry got involved. Ultimately, this became a scrap, even with the much less hair-raising approach to the objective.
The point to take away here, I think, is that I took similar casualties to option 1, yet accomplished much more - the price paid was worth it, as terrible as that is to admit.
So let's return one last time to Bil's blog and the Red Star article. What does it conclude, particularly with regards to the habit of throwing armour in as fast and as violently as possible?
Unfortunately, situations like this one...may still be found. There are still commanders who continue to urge on the tanks, at the same time forgetting the elementary principles of combat organisation and the fact that time spent [in preparation] will always be compensated tenfold.
This cannot be repeated enough. The final attack out of the ravine was launched with fifteen minutes left on the clock. Not a second of the preceding thirty minutes was wasted; and the final attack, when it arrived, was violent and nonstop. I moved fast, I played to the tanks tactical strengths, and I followed tactical doctrine. I just made sure I shaped the field as much as possible for success first.
The article concludes:
In combat there are times, of course, when it is necessary to rush forward without taking into consideration many circumstances. However, in ninety cases out of a hundred, it is possible to find the time and means to provide for a high rate of forward movement without unnecessary loss. The best method for saving time is thorough preparation of the operation and its quick execution...some of the finest operations that have been carried out by [Soviet] troops were characterized by thorough preparation and swift action.
So, there you have it. Obviously, recreating this anecdote created an 'ideal' that you may rarely achieve in action, but you should always chase it nonetheless. Don't make excuses for yourself like "I was on the clock" or "I felt at the time I couldn't spend a few minutes to..." - you very often can. Re-assess.
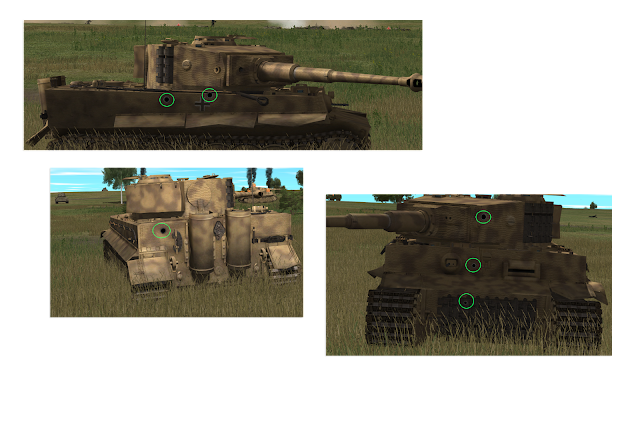
As an aside, if anyone is wondering why it got so ugly near the end...here's post-battle damage analysis of two of the Tigers, the latter accounted for 4 T-34s on its own.
Housekeeping and Personal Matters
Hope everyone enjoyed the read and I am sorry it's been a while since I've made a real post here. I do have an excuse though! I've been extremely busy since the summer, both with my original housing advice position and now, more recently, as an administrator and supervisor at a pro-bono legal clinic. All of this has come about since being called to the Bar of England & Wales. I'm officially a Barrister! For now I'm taking a well-deserved holiday with family back in Canada and trying to make up for some severely lost Combat Mission time.
 |
A much more palatable way of appearing in the Papers than a "Be on the look out for this suspect..."
|
Sadly, no photo of a gown and wig as I was called virtually when restrictions were still severe, my current position didn't allow me to delay my call to November as many of my colleagues did. They all have recently enjoyed the pomp and circumstance and it's been very gratifying to see them belatedly cross the finish line.
I suspect most readers are generally uninterested in all of this, but I also have some more CM related news. I am presently creating a "During Action Report" of a PBEM I'm playing with a good friend of mine, you can read it here: https://community.battlefront.com/topic/140524-dar-forging-steel-pbem/
Naturally, when it's all wrapped up I'll be making another blog post that will be a convenient table of contents with links to all the turns in order, as well as any interesting discussion points that come up when speaking with the peanut gallery.
That's all for now, until next time.


This was an outstanding post. Well done, and congrats on being called to the bar! That is a great achievement.
ReplyDeleteI wish I had thought of making a virtual presentation like you did with this anecdote.. and I thoroughly enjoyed your write-up and analysis of both approaches. If you hadn't included the Tigers, which would not have appeared in the original vignette then the end screen would have looked a little better, still very well done and am looking forward to more.
Thank you on both counts, Bil! Yes, I added the Tigers to try and add an additional challenge for myself, as I was playing my own scenario - but the tactical issue I think was a challenge in any event.
DeleteI am hoping to take advantage of this holiday to make up for lost time, we'll see!
An excellent read! As far as testing real world tactics in CM this is as good as it gets.
ReplyDeleteNot sure on how to create an account, but the above post was from me, Nathangun from the Few Good Men.
ReplyDelete