Combat Mission Fortress Italy's Operation Encore Campaign: An Overview
Operation Encore: Finally a Mountain Infantry Campaign

Rome to Victory (R2V), the latest module for Fortress Italy, is the first that brings Combat Mission's portrayal of the western front to V-E day. It comes with two campaigns that couldn't be further apart in tone. The first one, which I finished late last year, puts you in the shoes of an armoured battlegroup from the 6th South African armoured division in their first action in Italy. It's a relatively high speed run up the flank of a German formation, despite occasionally finding yourself in a mountain bottleneck.
The latter of these two campaigns is the polar opposite: Operation Encore. The campaign is eponymously named after the 10th Mountain Division's first serious operation along what the Americans referred to as "Riva Ridge." In the grand scheme of things, Encore was a relatively modest two-division action, intended to shape the front for further operations in spring.
That's the zoomed-out look, however. The action was significant for more than the fact it helped ease access to the Po valley and the victorious pursuit which followed. It involved a unit that was, despite its pedigree, basically a red-headed stepchild. The 10th had languished in the continental US since its inception, and was at the time of its deployment being considered for disbandment and use as reinforcements. With the benefit of hindsight that seems extremely strange, given there was ready-made terrain for them in Italy. However, when one recalls the desperate need of all belligerents for high quality infantry replacements, this cynicism from American high command can better be understood. In any event, the 10th's performance immediately proved the wisdom of having mountain-trained infantry when they kicked off Encore by scaling a sheer cliff several thousand feet high. The next several weeks of fighting would see the 10th and the 1st Brazilian Expeditionary Division fight across the ridge and its dominating features and threaten the Germans' supply lines.
This relatively small operation is therefore notable, in my view, for having forged in Brazil an instant military tradition, and cemented the wisdom for America of having specialist light fighters.
Here's a brief overview of the campaign. Needless to say, spoilers ahead.
The Mountain Infantry Battalion
At first glance, I think most would be forgiven for assuming that there was little difference between the US Mountain Infantry battalion and the standard Rifle Battalion. To be sure, they have the same structure that anyone who plays the US frequently will be familiar with. A four company organization, with three rifle companies and a weapons company. Each of the constituent rifle companies is this structure in miniature, with three rifle platoons and a weapons platoon. A pioneer platoon and a gun platoon round out the structure.
More of the same. Boring, right?
Well, perhaps that's more a matter of opinion. Having played through the campaign, the devil is in the details, and I was pleased to meet him. The Mountain Infantry Battalion's take on the weapon company puts an emphasis on portability. .50s replace the heavier water-cooled .30 cal. You lose rate of fire for an increase in punch and ease of redeployment. Likewise, at the company level, the MG sections consist of lithe five man teams carrying a 1919A6, rather than the more robust A4.

While technically heavier, the a6 (especially in game), allows for the .30 to be prepped and ready to fire at a much faster pace. This gives a particular edge in house-to-house fighting and or in any other complex terrain. When the fighting is a matter of 'be quick, or be dead' you appreciate these little differences. It also allows for the parcelling out of these assets to rifle platoons to be a bit more easily accomplished in practice. They more readily keep up with the riflemen.
Perhaps unsurprisingly, given the intention to fight in complex terrain, the standard 57mm anti tank platoon is substituted instead for a highly portable 37mm gun. Asides from plentiful ammo and an almost semi-automatic rate of fire, the T32 mountain gun's main advantage is that it deploys in under a minute. Packing up is a more complex matter, taking closer to 6 minutes. However, if the terrain allows for the use of the platoon's jeeps, packing up is simply a matter of climbing in with the gun.

The Mountain Infantry's rifle squads also appear, at a glance, to be essentially no different than the standard rifle squad. A couple of BARs, a submachine gun, and the balance of the squad riflemen.

This is true, to a degree, but there's several key differences. First, and inconsequentially in my view, squad leaders use the later M3 ("Grease Gun") rather than a M1 Thompson. More significantly, each squad has a designated marksman - not just the occasional rifleman with a scoped Springfield, an actual designated marksman with proficiency with that weapon. Finally, and most importantly, mountain infantry come loaded with grenadiers. Squads average 3-4 rifle grenadiers, and they have the ammo to actually make their impact felt. On average a squad will have 12 to 16 HE rifle grenades. For those more familiar with Volksgrenadier formations and their dedicated platoon-level rifle grenade teams: imagine if you had that three times over and you'll have an idea of how much firepower this really adds.

Understanding these subtle improvements in infantry firepower between the Mountain Infantry and the standard Rifle Battalion can decrease the frustration and maximise the enjoyment of the Encore campaign.
The Missions
Mission 1: Climb Riva Ridge

The campaign opens up with a night action, portraying the lead company of 1/86th Mountain Infantry Regiment securing rappel sites for the rest of their regiment. The implication, both in game and in reality, is impressive: these lead rock climbers scale several thousand feet of sheer cliff face, silently, at night and in combat gear. Like in reality, this means you catch the Germans massively unawares, and after brushing aside sleepy outposts, you can find yourself smashing into alarmed German infantry rushing to their fighting positions.

The complicating factor of the battle are that many of the outposts are effective log bunkers. This sets the tone for the next mission in a palatable way. It's low light and there's good cover and concealment. You can routinely outflank or bypass these isolated bunkers at minimum cost. Get your practice in now when it comes to bunker busting, as you will need to put it to effective use in less favourable conditions next mission.

It's a strong, if typical, start to a Combat Mission campaign: a solid company level engagement. What's more impressive is its historical fidelity, and how it immediately sets the tone for terrain for the rest of the campaign. There are no surprises here on out as to the complexity of the battlefields you are fighting on. You'll be fighting the terrain as much as the enemy, with many natural bottlenecks and ground that slows and tires your men out quickly. Frequent pauses to rest invite punishing mortar barrages, forcing you to balance resting your men with not presenting a stationary target. Make good use of the pause command to ensure spacing is maintained, as forest tends to cause your men to clump together.

Mission 2: The Snake is Smoking

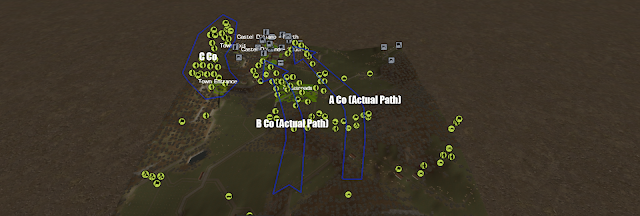
The second mission puts you in the shoes of a Brazilian company leader from II/1st Brazilian Infantry Regiment, capitalizing on the coup de main that puts the Americans on the higher slopes to the East. The map, whilst large, starts you immediately in a very obvious kill sack. However, this is your first real action of the campaign and you get the indirect fires you need to facilitate early movement. Having a real fires plan is the key to avoiding early, unnecessary losses.

Perhaps unsurprisingly, your force is also a mixed bag. The Brazilians mirror the standard American rifle company organisation, but tend to have only one automatic rifle per squad and have M1903s in lieu of the Garand. I would recommend careful task allocation of your platoons based on their aggregate soft factors. I noticed one of the rifle platoons was a cut above the rest, and given the narrow frontage we would traverse initially, started with my best foot forward. Hence the unorthodox one up, two back formation I adopted.
Read the mission briefing carefully. The briefings throughout the campaign are succinct and contain vital info, mostly about potential minefields and other similar obstacle belts.


Ultimately, the mission is not terribly difficult. Don't expect the world or some tactical blowout and you'll enjoy it immensely, I think.
I took most of my losses to enemy indirect fires and some mines (despite my best efforts). This mission isn't a stress test, and like in the real battle, the Brazilian forces are assigned a task proportionate to their experience and material. You won't find yourself terribly overmatched if you handle your troops with their relative quality in mind. As always, expect to measure your advance minute to minute in maybe a dozen metres at a time, and get ready for some real nasty forest fighting.


Mission 3: Storming Mount Della Torricia

The third mission in the campaign was certainly my favourite, albeit by a narrow margin. It ramps up the intensity with a snowy set piece attack, where you command an entire battalion of the 87th Mountain Infantry Regiment. You also face the most competent resistance of the entire campaign, fighting your counterparts: German Gebirgsjager. While the enemy infantry are made of the sternest stuff, I actually wouldn't rate this a particularly difficult mission if you take the time to plan it out and give it the respect it deserves. Again, I cannot stress enough, read the briefing carefully.

The mission was definitely notable for showing the relative focus between American and German equipment. By this stage of the war, Gebirgsjager have a shocking amount of firepower at the squad level, most of a gruppe is outfitted with light automatics. In Fortress Italy, they tend to lack the firepower of the equivalent units in Final Blitzkrieg (who were lavishly equipped with assault rifles), but still generally have 3-5 submachineguns per squad. This gives them a dizzyingly dominant position in the small fight. However, the American integration of weapons at the company and battalion level, in my view, completely overshadows the Germans - and it really shows in this mission.


In short, trying your best to force larger engagements is the key to victory. You'll have to do quite a bit of dangerous close-quarters work regardless, but you'll have the direct and indirect fires to shape the situation nicely whilst you close to destroy the enemy.
Despite the relatively heavy winds, ample use of smoke and co-ordinated prep fire will allow you to gain the space to manoeuvre your battalion as an effective entity. Smoke is your friend early on. I would also recommend that you keep your own battalion weapons reactionary, unmasking them only when firm contact is made - you should have no trouble creating effective horizontal C2 links between the rifle company leaders and the leaders of the mountain and machinegun platoons. If you do that, keeping the weapons in passive overwatch will be much more effective.

Careful infiltration is also rewarded, once again the enemy positions simply aren't continuous — how can they be in such terrain — and no matter what route you decide to take, you're likely to squeeze a company-sized force through an unexpected or uncovered route of approach. Again, move slowly and mind your spacing. You have ample time.

I won't tell you where the enemy counterattacks went in, but lets say even though my expectations were met, one of them still got ugly. I would say a fair proportion of my losses came from a very wild, very brutal firefight with one of these harassing flank attacks. As I was moving in columns of platoons with the company that ran into the Germans, I was able to, quite quickly, just take up hasty positions and face the threat, and fall back through the other platoons when the pressure mounted along with the casualties. Again, I took the time to stop and listen frequently, and keep a good distance between my travelling elements, which allowed me those crucial first spots and shots on the approaching enemy.


Mission 4: The Grand Finale

Definitely the most challenging mission. Once again a Battalion-level attack, this time with the reinforcements of a platoon of M24 light tanks and the weapons company of a neighbouring battalion. In this final mission you're pushing slowly down to the green fields beyond, in the midst of a spring thaw, to assault a mountain village that has been turned into a resistance nest. The mission is defined by the breath taking amounts of indirect fire on both sides, and a plethora of fixed German heavy weapons. I can say with confidence that 80 percent of my losses were taken from enemy artillery fire. You have to walk a fine line between keeping your men in a condition to fight, moving them deliberately through exhausting terrain, and dodging large, area-style fire missions with confusing spotting rounds.

It was far from a frustrating mission, however. I think I faltered a bit here in my scheme of manoeuvre and had to improvise much more than in the previous mission. Inevitably, this resulted in proportionately heavier losses. I think if you avoid my mistake and have a better plan, or more co-ordination, you should have no trouble. The Germans are not particularly high quality, so you can expect to press them out into the open with relative ease compared to the previous mission. You also benefit from some of the heaviest support I have seen since playing the "Lions of Carpiquet" campaign in Normandy.


Use every inch of that artillery and airpower. As always, use smoke and use it early. Your support batteries have a good mix of instant-blooming WP rounds and slower, longer-lasting conventional smoke canisters. By mixing these missions, I was able to cross the first several hundred metres in relative safety. This obscuration proved decisive to my left-flanking company. They were able to ultimately slip right past the main resistance points and install themselves on the high ground over looking the village. They were also able to support, with enfilading fire, the brutal firefight for the crossroads objective. This objective became the focal point of the fighting, as a German platoon was slowly pushed back onto several weapons platoons by my centre. Once they were pushed back with nowhere to run, the even fight descended into one-sided butchery, thanks to the close support of the armour.


Again, read the briefing carefully. It will give you an excellent read on how to use your supporting assets. Despite the loss of a Chaffee from an unexpected stay-behind group with a panzerfaust, you should be able to use your tanks aggressively, pressing them forward to give your men the much-needed room to manoeuvre. Much like the previous mission as well, the effective use of the supporting .50 calibre machineguns, 81mm mortars and the speedy T32 guns is key to success. Speculative fires, rather than passive overwatch, served me better here. As the terrain is more open, the mountain guns benefit from the use of their jeeps. Make good use of them to redeploy rapidly. I was able to keep the guns with the forward units right until the end (of both the battle, and their ammunition!). Needless to say, I was able to dodge several dangerous enemy fire missions as well.


I doubt you will have to physically secure every objective in this mission if your indirect and direct fires are effectively brought to bear. The fight was fought, in the main, for the town's entrance, exit and the crossroads. By the time C company had secured both entrance and exit and ensconced their weapons platoon on the heights, the enemy had little fight left in them. After a short minutes firefight in which a German HQ was shot up by the weapons, the Germans called it quits.
The mission is appropriately climatic; an exhausting final struggle to close off the campaign.


Final thoughts

If you want a late war infantry bash in unique terrain with unique units, then I highly recommend Operation Encore. If you remain unconvinced that there is enough separating the Mountain Infantry Battalion from the standard Rifle Battalion, then perhaps put this on the backburner.
From the perspective of design, I have no serious complaints. The maps are gorgeous and plausible. The AI plans all struck me as well crafted, which I know is a feat, as campaigns can be tough to effectively test. The campaign shows the ever-growing maturity of design in Combat Mission's singleplayer experience. The move towards short, sharp campaigns that focus on single operations, or lack core units, shows an increasing amount of accessibility in design. I don't personally think they should completely supersede the ambitious, larger campaigns such as Road to Montebourg or Hammer's Flank, but I am very glad to see more variety in length and complexity is defining newer modules.
My only issue is the lack of deployment control, especially in the final mission, with your battalion battle group separated in two zones, despite them being continuous. This forced me, essentially, to adopt the scheme I used in the final mission, unhappily. Being forced to cram two rifle companies and a weapons company into 300m frontage, when a spare company gets 600m of covered frontage to deploy into, strikes me as an odd arresting of my tactical choices. I'm not a stranger to extremely cramped deployments, as my recent Cut off at Kovering AAR demonstrates. They're far from a deal breaker for me, and I appreciate they can be a deliberate design decision to create a tactical challenge. Nevertheless, I reserve my right to whine about them every time I am subjected to such a deployment. If you're even less tolerant than myself, keep this point in mind. Asides from that bit of criticism, the campaign is top-shelf stuff all around.
Now, I took around 70-80 screenshots in all whilst playing this campaign, and as I tried to limit this blog post to a sane length I naturally didn't use them all. If you want to see a few more action shots, I've uploaded a gallery to Imgur: here. I've uploaded them in no particular order, so I think you won't get too much from them by way of help/spoilers than you have already.
Thanks, as always, for taking the time to read. 'Till next time.


Comments
Post a Comment